How to add sticky footer AdSense ad to your wordpress website

In this article, I will show you how you can add a bottom sticky footer Ad to your WordPress website. Sticky ads in Adsense perform better for site owners as the chances of ad clicks on this type of ads higher.
The overall CTR (Click through rate), number of impressions of ads, and earnings improve. In fact, many big websites, and news publishing houses use these footer sticky ads to boost their Adsense revenue.
So, lets begin our journey of configuring sticky ads first of all lets try to understand what are sticky ads, examples of sticky ads, and how you can implement sticky ads on your WordPress website.
What are Sticky Footer Ads?
As the name makes it clear that Sticky ads are ads that stick to a certain position on the website screen despite the scrolling of the visitors through the page. In this way, the sticky Ads get better exposure than other types of ads and also draw the attention of the visitors.
You can get the most Ad impression in the sticky ad. There is already a default sticky ad functionality in the auto ads settings of Adsense called “ anchor Ads “. But we are unable customize it and we cannot display the ads according to our own wish. That’s the reason why in this article I will be showing show you the easiest way to place sticky footer ads in a WordPress website.
Suggested: How to add adsense ads without using any plugins in wordpress
Some people also refer sticky ads as bottom sticky ads or floating ads . Visitors can easily dismiss the ad shown by clicking on the cross button available at the top right corner of the ad. In this way, you will get more earnings without hampering the user experience keeping your website simple and clean.
Here, one thing to take care the most of, is that don’t have any clickable items above or near these ads, they must be separate from the rest of the content of your website. You can also check the Adsense Guidelines on proper implementation of sticky ads here.
Adsense Guidelines for Sticky Footer Ads
- Don’t overload your page with ads. You need to ensure that all ads, including sticky ads,should take less than the amount of content on the viewable screen or viewport.
- Vertical sticky ads must never overlap or underlap any other page content.
- The ad should never come too close to the content, navigational site functions (including scrollbars), or another ad.
- Any ad implementation must provide clear differentiation between ad and content.
- Horizontal sticky ad units are not allowed to float away from window edges or follow thecursor.
- Horizontal sticky ad units are not allowed to float away from window edges or follow the cursor.
- sticky footer ads, should not cover more than 30% of your computer, tablet, or mobile screen.
Steps to Add Sticky Footer Ad in WordPress
To add the bottom sticky ad in WordPress, follow the below steps
Step-1 : Login to your Adsense dashboard and create a responsive Display ad unit.
Step-2 : Now copy the publisher id and data ad slot code and replace it in the below code.
<div class='sticky-ads' id='sticky-ads'> <div class='sticky-ads-close' onclick='document.getElementById("sticky-ads").style.display="none"'><svg viewbox='0 0 512 512' xmlns='http://www.w3.org/2000/svg'><path d='M278.6 256l68.2-68.2c6.2-6.2 6.2-16.4 0-22.6-6.2-6.2-16.4-6.2-22.6 0L256 233.4l-68.2-68.2c-6.2-6.2-16.4-6.2-22.6 0-3.1 3.1-4.7 7.2-4.7 11.3 0 4.1 1.6 8.2 4.7 11.3l68.2 68.2-68.2 68.2c-3.1 3.1-4.7 7.2-4.7 11.3 0 4.1 1.6 8.2 4.7 11.3 6.2 6.2 16.4 6.2 22.6 0l68.2-68.2 68.2 68.2c6.2 6.2 16.4 6.2 22.6 0 6.2-6.2 6.2-16.4 0-22.6L278.6 256z'/></svg></div> <div class='sticky-ads-content'> <ins class="adsbygoogle" style="display:inline-block;height:70px;width:100%;line-height:70px;" data-ad-client="ca-pub-xxxxxxxxxxxxx" data-ad-slot="xxxxxxxxx"></ins><script> (adsbygoogle = window.adsbygoogle || []).push({}); </script> </div></div> <style> .sticky-ads{ position: fixed; bottom: 0; left: 0; width: 100%; min-height: 70px; max-height: 200px; padding: 5px 0; box-shadow: 0 -6px 18px 0 rgba(9,32,76,.1); -webkit-transition: all .1s ease-in; transition: all .1s ease-in; display: flex; align-items: center; justify-content: center; background-color: #fefefe; z-index: 20; }.sticky-ads-close { width: 30px; height: 30px; display: flex; align-items: center; justify-content: center; border-radius: 12px 0 0; position: absolute; right: 0; top: -30px; background-color: #fefefe; box-shadow: 0 -6px 18px 0 rgba(9,32,76,.08); } .sticky-ads .sticky-ads-close svg { width: 22px; height: 22px; fill: #000; } .sticky-ads .sticky-ads-content { overflow: hidden; display: block; position: relative; height: 70px; width: 100%; margin-right: 10px; margin-left: 10px;</style>If this code is not working for unforeseen reasons, you can use this code.
Step-3 : Now Go to Appearance then click on theme editor then Footer.php file and search for the </body> tag.
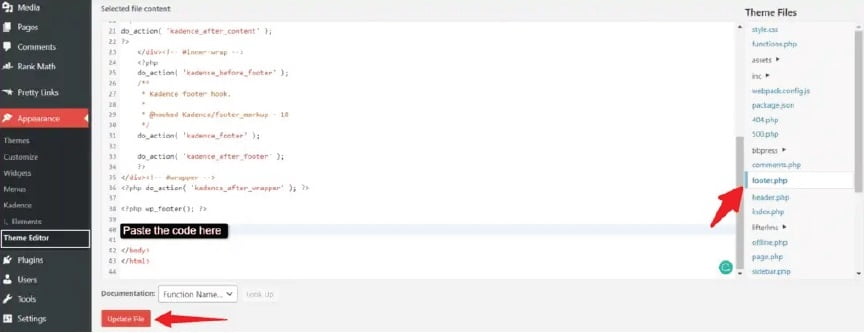
Step-4 : Paste the code just above the </body> tag and click on update file to save the changes.
Now the sticky footer Ads will start to appear on your WordPress website. You can try opening the webpage in incognito mode if it is not working.
Troubleshoot Sticky Ads
If the sticky ad code is not working properly then you need to check if your caching plugins Like LiteSpeed cache or WP-Rocket etc aren’t causing this Problem. In some cases, removing the unused CSS or javascript settings troubleshoots this type of issue of not loading of the sticky ads. You can also try deactivating the plugin temporarily, clear the cache and check in the incognito mode.
I do recommend you add this sticky ad code in the header section of your wordpress website too. In some cases, you may see a blank Ad similar to a white background.
happens if the ad fill rate is low. This means that there is not sufficient ad to display from the AdSense side then the ad slot will be blank white. You can try opening an old popular page where you are getting the high traffic to check if the ad is showing or not.
Here’s a video guide for the same:
If you don’t like to edit the theme code of your website then you can use a code management plugin that is going to let you add codes in the header and footer section of your website.

Conclusion
For this, I personally prefer to use the “Header Footer Code Manager” plugin by “99robots”. It is a free and effective code management plugin in WordPress that you can use. You can also set display rules for this code management plugin, like show only on desktop or mobile, load only on homepage or post page, etc. If you have some queries feel free to ask me in the comments.